
Project
Date Created
Author
Tools & Skills
lightboxdocumentationcamera
[CoF] Careers of the Future
Launch Lab Connection
Competency
Status
Student Review Needed
- Setting Up The Lightbox
- Setting up the Camera and Computer
- Preparing the Camera
- Taking the Photo
- Go To Downloading the Photo: Here
- Camera Cheat Sheet
- Inserting the Battery.
- Downloading the Photo
- Cleaning Up
Setting Up The Lightbox
- On the left top back side, Plug in the circular cord to turn on the light


- Opening the main flap, place your item in the box. Make sure to position it so that the front of what you are photographing is facing outwards, or upwards if you want that. How you set up you frame your shot can really impact how the final product will look, so be intentional about what you do.

- In the front left and right bottom side, Velcro the main flap in place so that there is maximum light reflection


Setting up the Camera and Computer
- There will be a computer with a yellow sticker next to the lightbox. This is the computer you will use to access your photos.
- Open the computer, by pressing the space bar twice. there should be no password.
- Open the application EOS Unity. It should say connect to an EOS camera, you will do that after you take the photos.
Preparing the Camera
Go To Camera Cheat Sheet to see where things are on the camera: Here
Any letter can be found on the cheat sheet
- There will be a camera carrying case next to the lightbox. Get the camera out and the first thing to do is put the strap on.
- On the side facing towards you, if the screen is not facing you, flip the screen (B) so you can see the screen and not the back of it
- On the top right of the camera, flick the switch to turn it on (D). If it turns on, skip inserting the battery. If it does not turn on, it most likely means the battery is charging and you need to insert it. Go to Inserting the battery: Here
- Pinching the middle of the cap, take the lens cap off (H) of the end of the lens.
- On the lens, push the button with a triangle (G) on it outwards while turning the lens. This starts the camera.

Taking the Photo
Go To Camera Cheat Sheet to see where things are on the camera: Here
Any letter can be found on the cheat sheet
- If you do not know about camera settings, set the spindle on the top right of the camera to the green A, auto (E). The white bar points to the chosen setting. Then click set to confirm the setting.
- You can then turn the lens left to right to change how zoomed in the photo is.
- Click the circle button (F) protruding out of the top right of the camera to take a photo.
- There are four different angles to take a photo from. Three on the front side and one on top. Test out which one works best for the shot you are going for.
- Move the flap to the side and it should stick there magnetically. You only want one flap open at a time to maximize light reflection
- You can also use a Tripod to take the photo. Open the Tripod then screw the camera into the screw on the tripod to the Camera (J). Be careful that the straps don’t get caught while screwing the camera into the Tripod. Holding the straps above and physically walking around the tripod is an easy way to screw the camera in. After you are done with the Tripod, screw the camera off of it, careful that you do not drop the camera.

- When you take a photo, it will end up on the computer EOS Unity. Go to Downloading the Photo: Here
- Here is an example of different angles to what the shots looks like:


Go To Downloading the Photo: Here
Camera Cheat Sheet
Go back to preparation: Here
A | Set Button |
B | Screen Opener/Closer |
C | Menu Button |
D | On / Off Slider |
E | Photo Spindle |
F | Release Button to take a photo |
G | Triangle Slider to open Lens |
H | Clips to take off Lens Cap |
I | Battery Holder Opener |
J | Tripod Screw |


Inserting the Battery.
- The battery will be charging in an outlet very close to the camera. First pop the battery out of the charger.
- On the bottom of the charger, open the battery holder (I) by pushing the gray opener to the right.
- Insert the battery so the face of the battery - the side that says canon - is facing the same direction as the lens. The battery should click in.
- Close the battery holder.
Go back to preparing the Camera: Here
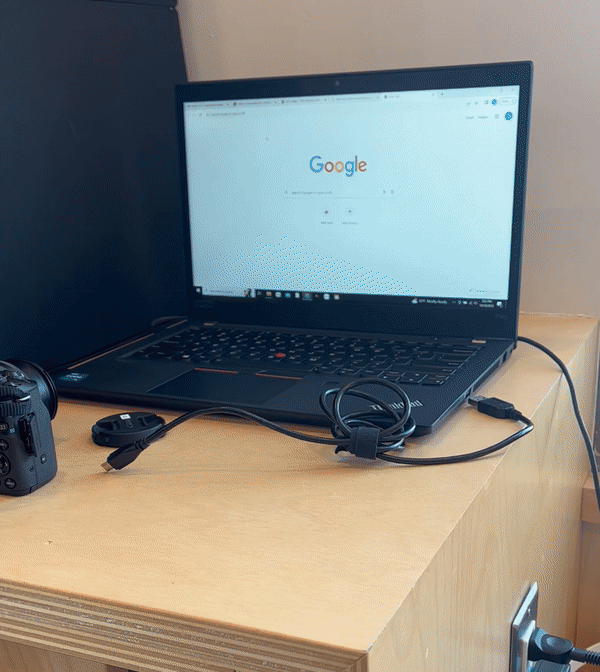
Downloading the Photo
- Make sure EOS Utility is still running on your computer.
- After taking your photos, connect the camera to the computer using the cord on the right camera bag. Plug in the USB on the computer and small HDMI to the top plug on the right side of the camera. There on the right side of the camera there is a flap you will need to open.
- Select that photo / photos and click the download button on that photo.
- This will save the photo in that classroom’s photo file which can be accessed on any computer in that classroom to easily add that picture to whatever you are doing on your computer.
- If the computer goes to sleep while you are taking photos and the program crashes, restart the computer and then open EOS Utility again to reconnect.
Cleaning Up
- Close all the open flaps on the lightbox and unplug it.
- Put the lens cap back on the lens by popping it on the lens and screwing it in
- Pushing the triangle on the lens up and turning the lens to the right, close the lens.
- Turn the camera off
- Pull out the screen, flip it so the screen is facing inwards and close the screen.
- Pop out the battery case, push back the gray bar to get the battery and put it back in the charger so the arrow of the battery points to the arrow on the charger. Close the battery case.
- Put the camera back in the holder with the lens facing downward. Put the straps over it to keep it on place then close the case with the strap inside.